By using the group option, resources may be grouped by similar skills, work crew, or pay formula. This grouping option allows a limited number of records displayed on the Labor Hours screen when selecting a group. Viewing or printing records for reports can also be limited when a labor group is selected in the report criteria.
The Labor Group - Assign Labor screen can be accessed from the Resources or the Settings menu link.
Open the Labor Group - Assign Labor screen from the Resources menu link
Hove a mouse pointer over the Resources menu on the menu bar to display its drop-down menu.
Slide a mouse pointer over the Add Resources option to display its menu.
Click Labor Group to open the Labor Group - Assign Labor screen.
Open the Labor Group - Assign Labor screen from the Settings menu link
Hover a mouse pointer over the Settings menu on the menu bar to display its drop-down menu.
Slide a mouse pointer over the Labor option to display its menu.
Click Groups to open the Labor Group - Assign Labor screen.
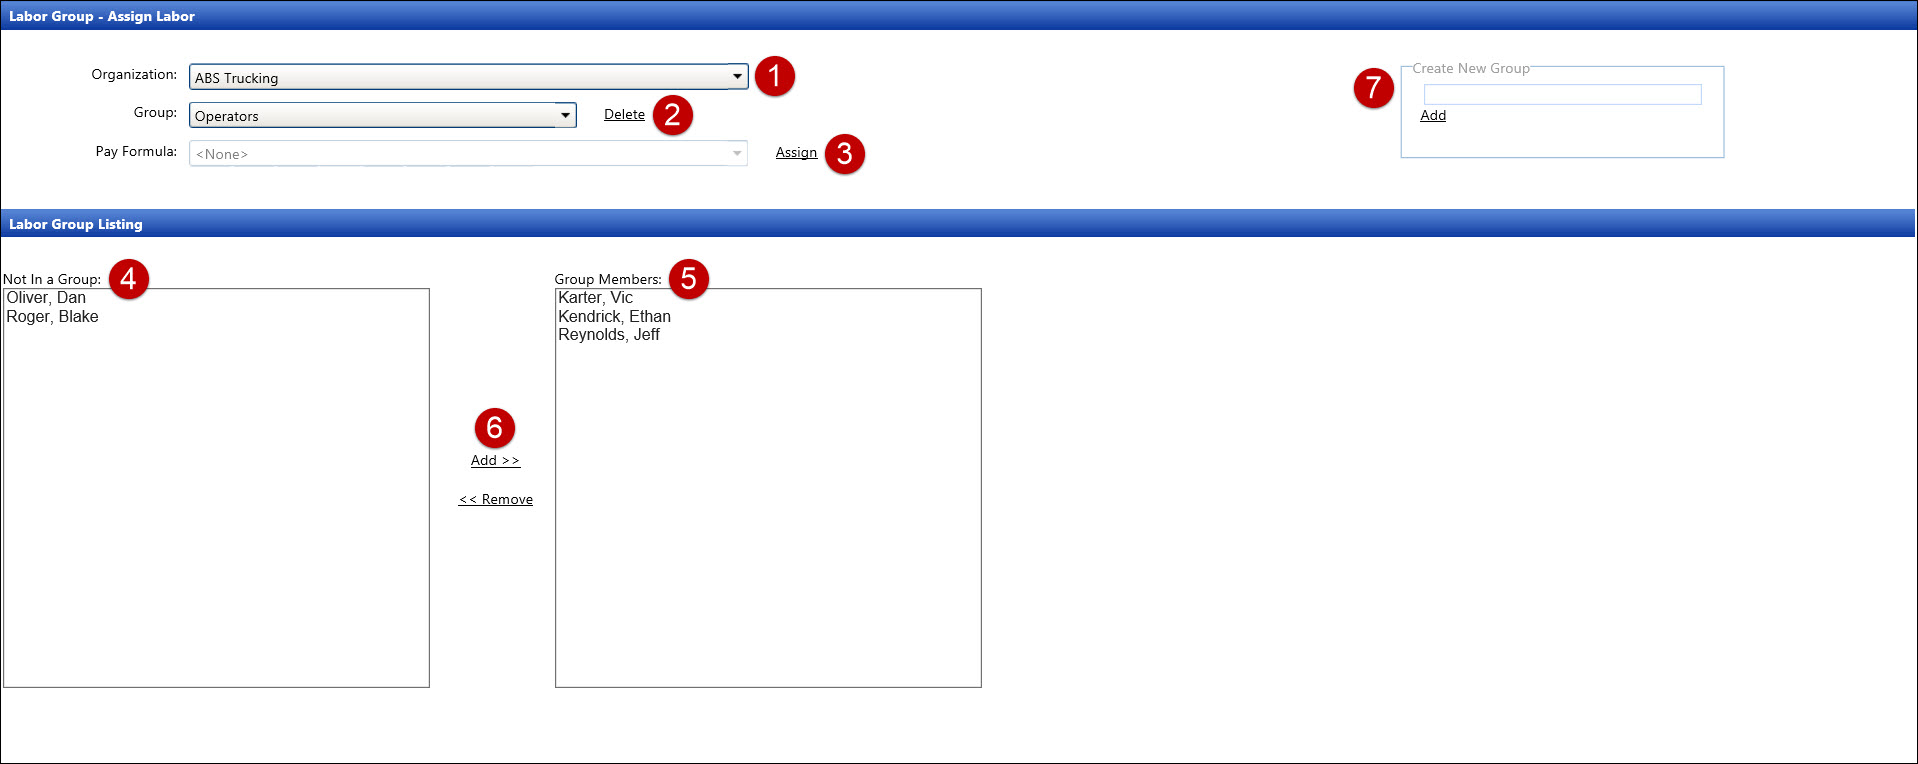
The available organizations are displayed in the Organization drop-down list.
The selected organization's labor groups are displayed in the Group drop-down list. The Delete link is available to permanently remove a labor group.
Pay Formula is displayed as read-only field. Click the Assign link to open the Pay Formula Assignment screen. Refer to Pay Formula Assignment to assign a pay formula to a labor group.
The available labor resources, who are not assigned to a selected labor group, are displayed in the Not In a Group list box.
The labor resources, who are assigned to a selected labor group, are displayed in the Group Members list box.
The Add and Remove links are available to add or remove labor resources to or from the selected labor group.
Create New Group text box is available for creating a new labor group name.
After adding a new labor group, it will appear in the Group drop-down list. The labor resources that are available to add to a new labor group are displayed in the Not In a Group list box. The Group Members list box remains empty until a labor resource is added.
If applicable, select a location from the Location drop-down list located at the menu bar.
From the Labor Group - Assign Labor screen, select an organization from the Organization drop-down list.
Enter a new labor group name into the Create New Group text box.
Click Add to save the new labor group to the Group drop-down list.
If applicable, select a location from the Location drop-down list located at the menu bar.
From the Labor Group - Assign Labor screen, select an organization from the Organization drop-down list to display its groups in the Group drop-down list.
Select a labor group from the Group drop-down list.
From the Not In a Group list box, click one or more resources, using the Control and Shift key controls. (see also Control and Shift Keys)
Click Add to transfer the selected labor resources to the Group Members list box.
If applicable, select a location from the Location drop-down list located at the menu bar.
From the Labor Group - Assign Labor screen, select an organization from the Organization drop-down list.
Select a labor group from the Group drop-down list.
From the Group Members list box, click one or more resources, using the Control or Shift key control. (see also Control and Shift Keys)
Click Remove to transfer the selected labor resources back to the Not In a Group list box.
If applicable, select a location from the Location drop-down list located at the menu bar.
From the Labor Group - Assign Labor screen, select an organization from the Organization drop-down list.
Select a labor group from the Group drop-down list.
Click Delete. The delete confirmation pop-up message appears.
Click OK to delete the selected group and transfer the labor resources back to the Not In a Group list box.